

Week 4
- dejamichele
- Apr 18, 2022
- 4 min read
Updated: Apr 26, 2022
Final result for the week:
Process
04/24/2022
For the past couple of days, I have done more velocity tests. This time from the render camera. I think I have finally found the right velocity for the exhaust smoke, but I think the motion still needs work. Due to how I made the smoke, I couldn't use the buoyancy and wind set up in the pyro solver. Instead I used 2 fans, one below and one on the side, to lift up the smoke and make it blow towards the camera.
2nd render test - changes to movement (buoyancy + wind), color, and velocity (80)
Feedback from Professor Fowler - faster
I was increasing the velocity slowly because I went from 1 to 100 and Houdini crashed. I've been trying to avoid going that high, but it needs it. The next 2 tests I did were at 150 and 250. These flipbooks also give a look into how I set up the pyro and why I had to use fans instead of the settings in the pyro solver. I don't really see a huge difference between them, but I went with 250 for the 3rd render test.
velocity: 150
velocity: 250
I am having trouble parenting the pyro to the car. The car imported into Houdini in a subnetwork and I can't parent the pyro to that because the subnetwork doesn't have keyframes. Its the Geometry inside that does. So I copy and pasted the geometry with the keyframes to the top level, however I don't know how to merge them. So the pyro only follows the slight movement of the car for this render. I would have had it follow the bigger movement, but it doesn't stick with it. As soon as it starts moving, the pyro takes off ahead than what it should be following. They start and end together, but loose each other in the middle. I also need to work on the pyro going through the tailpipe.
Parenting Issue


3rd and final render test for the week (same as video at the top)
04/20/2022
Some of the notes I got from the mentors and professors this week included adding buoyancy, wind, lighter color, and more force. The first thing I'm trying to fix with my exhaust is the speed. The velocity in the prior videos is 5.
velocity: 15
velocity: 30
velocity: 60
velocity: 80
04/18/2022
I've got my first render back and put it over the background in Nuke. I had some render farm issues, so it didn't turn out exactly as planned. I cached out the simulation for both of my layers of pyro, but for some reason all the renders I got from them were empty. I thought I may have referenced the HDRI wrong and there was no light in the scene, but that wasn't it. I put the renders back on the farm without using the cache and they came back as expected, except the smoke was pink instead of gray. So there is something weird going on with how I'm referencing the HDRI, but for this first render we are just going to work with what we have.
Both references I have are the same car we are working with, the Maserati MC20. For this week I plan to work on the speed and look (color and shape) of the exhaust smoke. I need to spend more time lighting it. This render has a bit of a flickering issue at some points. I'm not sure what's causing it, but I think the problem happened in Nuke. I'm going to pay close attention to way the exhaust smoke starts and stops in the reference on the left. Especially when the car takes off.
As mentioned above, I rendered out layers. The initial idea was to use the thin stream for when the car was sitting still and then have the thicker stream come out whenever the car takes off. After looked at them together in Nuke and comparing it to my reference, it didn't feel right. The thin stream was too uniform. It could possibly still be of use if I added more wind or amplitude (at 0 for the thin stream and 1 for the thicker stream). (flipbooks and more information about how I went about creating these streams in week 3 blog)
Thinner layer alone
Thicker layer alone
Together
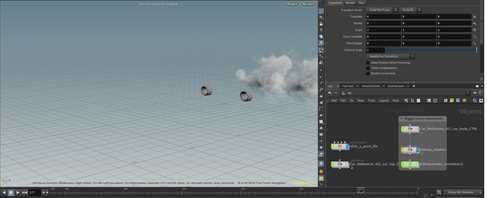
I may need to go back and change the density of the pyro in Houdini. I'm not 100% sure if it is a density issue or a lighting issue. Maybe both. I decreased the renders opacity and color graded the pyro in Nuke because it was so thick and dark. This is how it originally looked after I added a hue correct so it wasn't pink anymore.

This is how my node graph is looking so far. The roto nodes under the transforms are to get rid of the sphere shape that the pyro is emitting from. The roto connected to the merge (out) takes out the pyro closest to the car. The roto connected to the merge (in) brings back the pyro closest to the car, but at a lower and adjustable opacity. I may not need these once I get the lighting right. For now, I have a time offset to have the 2 exhaust streams. In the future, I plan to render out 2 different ones in Houdini so there is more variation beyond just when they start.

Reference videos used above:
(3:18)
(4:37)
Comments