

Week 6
- dejamichele
- May 7, 2022
- 4 min read
Updated: May 10, 2022
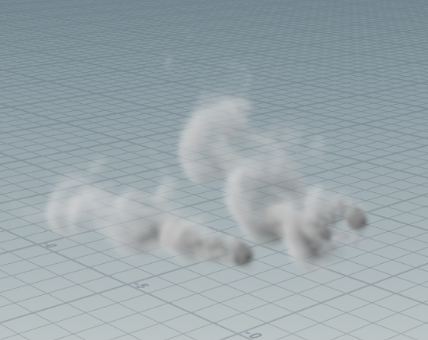
Final Result for the Week:
There were some big things to figure out this week.
How to have the pyro follow the cars movement without ruining or altering too much of what I already have.
Making sure the pyro interacts with the car and tailpipes instead of going through it.
Making wet tire marks.
Getting heat distortion in the first shot.
5/8
Due to how the render came out from Arnold (last video under 5/3) the pyro is now being rendered out of Mantra. Today I was able to get the "tailpipes" working along with hiding the emitters. I also added a fill light and a rim light to my set up in Houdini.
"Tailpipes"
So the geometry being used as the tailpipe wasn't going to work unless it was thick. However, even when it was thick I was still having an issue with it going through the top. I increased the depth and that solved that issue. Now that the pyro had an object to collide with, the stream got smaller which caused my fans to be too excessive. I decreased the max distance on my fans to where I was getting a similar buoyancy and wind as I was getting before.


Emitters
Next problem to tackle is the emitters. Now that we are not rendering in Maya and hiding them in the cars tailpipes, I need to hide them. I couldn't figure out how to matte the emitter without taking away the pyro with it. I tried to force matte it in the output, but it would only let me select a whole geometry node. I could not dive inside of it. To solve this, I copied the spheres and all the transforms to another geometry node. I then increased the size of those spheres to encompass the original spheres that were being used as the emitters. Then I forced matte that geometry node.


I ended up increasing the size even more in the y and z axis to hide the pyro that went over the edges.
Lighting
For the past renders, I only had 1 distant light in Houdini lighting the pyro. I now have a key, fill, and rim light in there. I also have the animated car rendering as a phantom object so that the pyro closest to the car is in the shadows.
This is the first render I got back. It wasn't until this was comped that we saw that the pyro did not follow the car. I had to go back into Houdini and adjust all the keyframes for the take off since the ones from Maya weren't translating.
This is the same lighting with the updated keyframes. I think I need to adjust my lighting or check on the car that is providing the shadow because it seems to move weird in some areas. Like there may be something in front of it.
I also did a render with motion blur enabled to see if it anything changed.
5/6
Next up is making the "tailpipes" again and getting that vdb to Allie asap.
5/5
Over the past couple of days, I was able to work with Kat in getting a version of the car into Houdini where
spheres were placed into the tailpipes.
the spheres were parented to the car in Maya.
the spheres had keyframes on them when brought into Houdini.
there was not a keyframe on every frame.
Instead of using those spheres as the emitters, I used them as a reference. I moved back to an earlier version of my pyro because with all the switching of emitters and positions, I lost the behavior that was working. So I took the z keyframes from the reference spheres and pasted them onto the y axis of the original spheres. Then I changed all the negative values to positive and vice versa. I did this before feeding it into the source node to ensure the pyro had the right movement when taking off.


Then after the pyro look node, I have 3 transformations. One to turn the pyro on its side. Another to position it inside of the cars tailpipes. Then the last one is a copy of the reference spheres y axis keyframes being pasted on the y axis of the transform so that the smoke follows the little movements car does before driving forward.

I feel a lot better now that this is all figured out. Probably something we should have been had a pipeline for.
5/3
Last week I had an issue with parenting the car and getting it to move the right way when it takes off. One of the solutions I tried was switching the y and z keyframes. So instead of the pyro taking off in a direction to the left or right of the pyro, it would go towards or under. Unfortunately, just switching the keyframes had the the takeoff going in the same direction that the pyro was blowing. To fix this, I had to go in and change all the negative keyframes to positive and vice versa. The bad part of this was that there was a keyframe on every frame. This wasn't an efficient solution for when the animation would change. It also only partially worked. The take off was a little too extreme and stretched a lot.
This is how it looked rendered with the car.
5/2
To get the pyro to not go through the tailpipes, I tried making the tailpipes a static object. That did nothing, so instead I made a tube in Houdini with the inside radius the size of the tailpipe. I extruded it to be super thick hoping that there would be no way the pyro would make it through. It didn't work.

I surrounded one of the emitters with long cubes instead to see if the tube was the problem.


Eventually I noticed that the tube didn't have an interior. Once I checked off that option in the extrude node, it worked.


Comments